Google+

May 28, 2017

Deep Dish Pizza

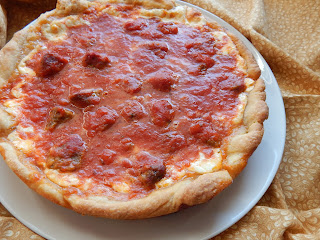
I've been enjoying my summer vacation for the last few weeks, but after roasting in Atlanta for a while I'm ready to head back up north. Plot twist: I'm not going back to Madison, I'm going to Chicago for an internship. I've been waiting for real deep dish pizza for months ever since I first accepted the job offer, so I had to improvise and make some myself. I know most of you can't trek out to the Windy City for some deep dish of your own, so today I'm sharing the recipe that motivated me for the last few months.


A lot of people don't consider deep dish 'real' pizza. For me, I think it's pizza but in a whole different category. It's obviously not your typical thin and crispy or soft and puffy yeasty dough; it's a thick, buttery, flaky crust with a touch of cornmeal for some extra crunch. That gets layered with mozzarella cheese and then the sauce so that the sauce doesn't make the crust all soggy while it bakes. I recommend adding some toppings (my favorite is meatballs) on the cheese before the sauce so they don't dry out; the toppings break up the insane amounts of crust, cheese, and sauce so there's actually some substance (and maybe some healthy stuff) there.


If you've ever made pizza dough (or any yeasted bread before) you'll recognize a lot of the basic techniques. You have to activate the yeast in some warm water and a bit of sugar, then mix it with the dry ingredients and knead until elastic. This is pretty similar except you'll add some cornmeal for texture and some melted butter for richness. The dough has to rise for a bit and then the fun part begins. You get to slather the whole slab of dough in butter, roll it up, and let it rise again. It's kind of like making cinnamon rolls except it's just butter and you get a pizza at the end.


The sauce may also be a little bit different than what you're accustomed to. Deep dish pizzas usually have a raw, chunky tomato sauce that gets cooked while the pizza bakes for a long time (it's not one of those 90 second Neapolitan pizzas). I like to use a can of crushed San Marzano tomatoes since they have some texture without being too chunky for my taste and they have such a bright flavor with just the right amount of sweetness and acidity. Of course, just about any can of any tomatoes will work; you can take canned whole tomatoes and crush them yourself or just go with a can of tomato puree for a smooth sauce. I combine the tomatoes with some garlic, onions, spices, and a bit more sugar and lemon juice to taste. I only let it cook for a few minutes until all the flavors meld together since it will get cooked for a long time while on the pizza.


Real Chicago deep dish places often have their own special pans for baking the pizzas so they cook through and get all nice and crispy without over-browning. I've found that a regular 9" round metal cake pan yields a crispy crust and can hold all the deep dish action without overflowing. Just press in the dough and make sure it creeps all the way up the sides. I top it with thin slices of mozzarella (slices are better than shredded here, trust me), all my toppings (gotta have those meatballs), and a few ladles of sauce to cover everything. As tasty and decadent as all of this is, the best part is that it makes two whole pizzas, and they make great leftovers.


3 1/2 Cups Flour
1/2 Cup Yellow Cornmeal
1 1/4 tsp Salt
1 T Sugar
2 1/4 tsp Yeast
1 1/4 Cups Warm Water
1/2 Stick Butter, Softened
1/2 Stick Butter, Melted
1 28oz Can Crushed Tomatoes
1 Small Onion, Diced/Minced
3 Cloves Garlic, Minced
2 T Sugar
1 tsp Lemon Juice
1/4 tsp Basil
1/4 tsp Oregano
1/4 tsp Thyme
12oz Mozzarella, Sliced
1/3 Cup Grated Parmesan
Meats and Vegetables

In the bowl of a stand mixer, combine the warm water, yeast, and sugar. Let sit for 5-10 minutes or until the yeast has activated. Using the dough hook, stir in 2 cups of flour, cornmeal, and salt. Add the melted butter, then gradually add the remaining flour until the dough comes together. Knead on medium-low speed for 5 minutes or until it is elastic and pulls away from the bowl, adding more flour as necessary.

Roll the dough into a ball and place in a large greased bowl. Cover with plastic wrap and let rise in a warm area for 1-2 hours or until doubled in volume.

Punch the dough down and turn onto a floured surface. Roll into a rectangle about 1/2" thick and spread evenly with the softened butter. Roll into a log and cut in half. Place the dough balls back into greased bowls, cover, and let rise again for an hour in a warm area.

Meanwhile, heat some oil in a medium pot. Add the onion and cook for 2 minutes or until fragrant and translucent. Add the garlic and cook for 1 minute. Stir in the tomatoes, sugar, lemon juice, basil, oregano, and thyme. Simmer for 20 minutes.

Heat oven to 425F and grease 2 9" cake pans.

Roll each ball of dough out to fit the pans, making sure the crust goes all the way up the sides. Place the mozzarella slices on the crust, limiting gaps as much as possible. Top with any meats or vegetables, then spread the sauce on to cover. Sprinkle with the parmesan.

Bake for 25-30 minutes or until the crust is deeply browned.

Makes 2 9" Pizzas
Recipe Adapted from Sally's Baking Addiction


May 17, 2017

Mixed Berry Lemon Scones

We're having a heat wave down in Georgia. At least that's what I'm telling myself because this impossibly hot 90-something degree weather with 90-something percent humidity can't last the entire summer. I'm moving back up north in a few weeks, but for now, the only things getting me through this never-ending sauna are light, fresh recipes like these lemony berry scones. They're fluffy, bright, and packed with gorgeous seasonal berries. The scones aren't too sweet (like scones should be) and are complemented by the gentle acidity from the lemons and the tartness of the berries. You can switch it up with some other citrus fruit or your favorite blend of berries, but for me, you can't top the lemon paired with strawberries and blueberries. I also drizzle the scones with a blueberry glaze, but you could easily swap it for another berry, a citrus glaze, or no glaze at all, though a crunchy oat streusel would also be delicious.


This recipe starts like all my other citrusy recipes: by rubbing the zest into the sugar. This allows the oils in the zest to permeate the sugar and therefore every bite of the scones. Just use your fingertips to rub the zest and sugar together; the sugar should become damp, fragrant, and take on a pale yellow hue.


That lemon sugar gets thrown in a food processor with the other dry ingredients, specifically flour, baking powder, and salt. Like most pie crust, biscuit, and scone recipes, I then add cold cubed butter and pulse just until small bits of butter remain. By this point, my food processor is pretty much full, so I'll usually dump this mixture out into a big bowl to finish the dough. You could technically do all of it by hand, but the summer is my chance to be lazy so you better believe I'm not going to mix butter nuggets in by hand if I have equipment to do it for me.


Once all the butter is mixed in, I stir in the wet ingredients. Normally I use buttermilk, but there's enough acidity from the added lemon juice that regular milk will suffice. For extra richness, I'll substitute half the milk for half and half (say that five times fast), though you can use just milk if that's all you have on hand or substitute in a splash of cream. Although vanilla isn't a main flavor here, I always add a spoonful when baking.


Now for the berry part of the scones. Since these are mixed berry scones, you can use whatever berries you want. Think raspberries, strawberries, blackberries, blueberries, lingonberries, or whatever other blueberries you can find in stores, in fields, or on the internet. Take the internet results with a grain of salt because technically tomatoes, peaches, potatoes, and watermelon are all berries and, while delicious, wouldn't really work here. Today I chose a combination of strawberries and blueberries since I happened to have them and I knew the blueberries would make a gorgeous purple glaze, but that could easily change the next time I make this recipe.


Unfortunately, you can't just throw the berries into the scones even if you're using fresh ones. You have to macerate them to remove some of the water to avoid the extra moisture leaching into the scones and making them soggy. If that sounds scary, all you have to do is toss the chopped or whole berries with a few spoonfuls of sugar and let it sit for a few minutes. Because of changes in concentration (sugars and other molecules) inside and outside the berry cells, the water will move outside the fruit so you can drain it and avoid soggy scones. This is particularly important for frozen berries since the cells were already ruptured by ice crystals during freezing, which allows more of the juice to flow out more easily (so it's really important to drain it off before mixing into the dough).


After you fold the macerated berries into the dough (avoid over-mixing if you want to avoid tough scones), it's time to shape and bake. I like chubby little triangular scones, but you can shape these however you want. You can scoop them into round drop scones, make one big round cut into long/narrow triangles, or cut them however you like, though I can't guarantee they'll keep their shape. The trick is to keep them cold until you pop them in the oven, much like all the other scones, biscuits, and pie crusts I've made in the past. This makes the butter steam when it heats up to make the scones flaky.


The last part of this recipe is the glaze. Again, it's completely optional, but everyone who has seen and tasted these scones has commented on the beautiful purple glaze. It's so simple you can make it while the first batch of scones are baking, and it adds an extra pop of flavor and color. I had an extra cup of blueberries on hand, so I heated them up for a few minutes with some lemon juice until they started to burst and release liquid. I strained that liquid, let it cool, and mixed it with enough powdered sugar to create a thick, sweet glaze. I drizzled it all over the cooled scones, and you could sprinkle it with some extra lemon zest if you really love lemon. You could also make it with any other berry, though you might have to throw it in a food processor to make a smooth glaze instead of just straining it.


I apologize for the long post; this is just the first time in weeks I've actually had time to write this much. For those of you keeping up with my crazy college escapades, I'm home for the next few weeks cooking up a storm to build up a stockpile of recipes to publish for the rest of the year. Next month, I'm moving back up north to Chicago to start my internship working on flavoring at Wrigley. I'll keep posting recipes (and lots of Instagram pictures from all the cool restaurants I plan on visiting), so not much will change other than my home base and the lack of crazy roommates (hopefully). I plan on making my new roommates for the summer a batch of something yummy like these scones, and I'm sure I'll make them for some event like a Memorial Day party or a weekend barbecue, if you can even throw barbecues in Chicago. I'll keep you posted.


2 T Lemon Zest
1/2 Cup + 2 T Sugar
3 1/2 Cups Flour
1 1/2 T Baking Powder
3/4 tsp Salt
1 1/2 Sticks Butter, Chilled & Cubed
1 1/3 Cups Milk (or 2/3 Cup Milk plus 2/3 Cup Half & Half)
1 tsp Vanilla
3 T Lemon Juice
1 1/2 Cups Berries
Berry Glaze (Optional; See Below)

Heat oven to 425F. Line a cookie tray with parchment paper.

Toss the berries with 2T sugar and let sit for 15 minutes. Drain off the juice.

Rub the lemon zest into the remaining 1/2 cup sugar. Transfer to a food processor and add the flour, baking powder, and salt; pulse until combined. Add the butter and pulse until small lumps remain. Transfer to a large mixing bowl.

Whisk the milk, vanilla, and lemon juice together. Stir into the scone base until just combined. Gently fold in the berries.

Cut the dough into quarters. Form each quarter into a circle and cut into quarters or shape as desired. Transfer to the baking sheet and bake for 14-16 minutes or until golden brown. When cool, drizzle with glaze if desired.

For the glaze, cook 1 cup berries with 3T lemon juice in a small pot over medium-low heat for 10 minutes or until juices are released, crushing the berries as necessary. Strain; there should be about 2/3 cup of juice. Add 3-4 cups powdered sugar and whisk until smooth.

Makes 16

May 10, 2017

S'mores French Toast

Mother's Day is coming up, and for some reason that always means fancy brunch recipes. Sure, you could wait in line forever at your local trendy brunch spot, but a brunch at home is just as good and you can sit in your pajamas eating as much bacon as you want without being judged. I mean, I can do that at Waffle House and nobody would even blink, but you can't have fancy quiche, blueberry coffee cake, or this insanely delicious french toast concoction at Waffle House. You can always use this base recipe for French toast and spice it up with berries, peaches, toasted nuts, nutella, and/or chocolate, but here I'll tell you how to s'more-ify it for maximum gooeyness.


For my family, all good French toast starts with Challah bread. Challah is kind of like Jewish brioche; it's a rich, dense braided egg bread that is perfect for soaking up the French toast custard. They do sell it at my local grocery store, and we ask for it unsliced so we can cut it into big, thick slices at home instead of their thin slices. If you can't find Challah, brioche is the next best thing, and day-old plain white bread can suffice as well. Again, make sure you slice it yourself or ask for thick slices because that's the only way to get a crispy exterior while retaining a soft, custardy interior. Thin slices will end up with the texture of soggy toast, and the beauty of French toast is the creamy center.


The bread gets soaked in a lovely vanilla custard, which consists of milk, eggs, vanilla, and a hint of nutmeg. You can add vanilla bean for more flavor, and you can also add a bit of sugar depending on how sweet your toppings are. Here, we're using marshmallows and chocolate, so I don't think it needs any extra sweetness. Some people also add cream or half-and-half instead of part/all of the milk for extra decadence, but I'm already consuming enough calories at this brunch so I skipped it.


I know some people like to make this bread pudding style and soak the slices overnight, but then it basically falls apart in the pan when you try to cook it. I've found that it takes less than a minute for the bread to soak up enough custard, though if you have dry, stale bread (not a bad thing here!) it may take a bit longer. You want the custard to reach the center but not soak long enough that the bread starts to come apart.


I fry mine up in a big skillet or on a griddle with a mixture of butter and oil. The butter adds flavor while the oil prevents it from burning since butter burns/browns at much lower temperatures. They only take a few minutes per side to become perfectly golden brown and cooked through. If you're cooking for the masses, you can transfer the cooked French toast to an oven set around 200-250F to keep it warm while you finish up the rest.


While the French toast is cooking, it's time to make the s'mores topping. I use the same technique as I did for my actual s'mores to toast the marshmallows: broiling in the oven. Although I did get a kitchen torch for Hannukah this year, not everyone has one and I've found broiling in the oven on the top rack gets your marshmallows toasty brown and gooey. They go fast, though, so make sure you keep an eye on them. I transfer the toasted marshmallows to the French toast, sprinkle with mini chocolate chips (or a quick spread of Nutella), and promptly eat 8 slices (after sharing with my mom, of course). For some true s'mores action, you can also crust the French toast in graham cracker crumbs before frying (the custard will make the crumbs adhere). It's so good you won't even need maple syrup, and your mom will forgive you for however many hours of labor you put her through (sorry Mom!).


2 Cups Milk
5 Eggs
1 1/2 tsp Vanilla
1/4 tsp Nutmeg
1 Loaf Challah
Marshmallows
Chocolate Chips

Whisk the milk, eggs, vanilla, and nutmeg together. Slice the bread into 3/4" thick slices.

Heat some butter and/or oil in a frypan or griddle over medium heat. Dip the bread in the batter and let soak for a few seconds until mostly saturated. Transfer to the pan and cook until brown, about 3-4 minutes per side.

Toast the marshmallows on a baking sheet under a broiler or using a kitchen torch. Transfer to the toast and sprinkle with chocolate. Serve immediately.

Serves 6